Saturday, July 28, 2007

Echoes of Leyendecker 2


I hope that you read an article I wrote a few months back about the great American illustrator J.C. Leyendecker. I love his work and would like very much to be able to create work in that style.


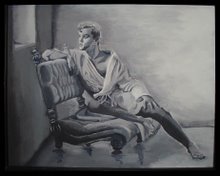
After painting the "Pink Trunks" man I was very disappointed. I felt as if I had started out with a good idea but got further and further away from the original composition I had planned. The original idea was to work in a very soft and transparent style. I wanted a very romanticized and atmospheric piece of artwork. Instead, my piece was very hard and sculptural and solid. I think the end product was one hundred percent the opposite of the style I planned to create.


While the result was unintended I have to admit that its not unappealing. There are some strong points about this piece. The balance and symmetry of the figure is good. The treatment of light, shadow, highlight, reflected light, and skin tones are appropriate. But, why did I lean in this direction? I thought about what my personal tastes in figurative art were. I tried to remember what influenced me. My first love of art was the Renaissance master works of Michelangelo and Da Vinci. The sculpture of Michelangelo and Bernini. So, is there any wonder why my work might have that very modeled and sculptural look to it.


I've also just been reading a book about the great American illustrators, Maxfield Parrish, Norman Rockwell, and his mentor J.C. Leyendecker. I found some illustrations by Leyendecker and was struck by a few similarities between his work and mine. First of all, there is the very statuesque and stylized rendering of the figure. Secondly, I noticed the cool bluish reflected light on the legs. And finally, I see the strong, almost polished quality of the highlights on the skin.
Am I suggesting that my work matches the quality of Leyendecker? Absolutely not. I'm analyzing this piece with as much modesty as I can muster. But, I am trying to convince myself that the aesthetic that I achieved is one that has been previously demonstrated and widely appreciated in another era. It can't be denied that the beautiful male figures in Leyendecker's work were extremely stylized and decorative. He wasn't trying to show those men as hardworking All-American athletes. He was blatantly celebrating a fantasized, idealized depiction of beautiful men. Apparently the publishers and readers of the Saturday Evening Post were celebrating right along with him.


Leyendecker's athletes had a definite sensual vitality to them. They look waxed and ready to go onstage as Chippendale's dancers more than prepared for a rowing competition. Yet, in the 1930's this image had a certain innocence to it. In that day and age these figures could be admired as beautiful without being overtly sexual. If the same type of cover were on a magazine today it wouldn't be a painting. It would feature a photograph of near naked sweaty fitness models. Where's the "art" in that? When put that way, I'm proud to have painted a piece that reflects Leyendecker's style.

Sunday, July 22, 2007

Doing Digital

I've recently found a site called Deviant Art. I know, I know. The name of the site sounds suspicious, but believe me, it's not. I t mainly focuses on non-traditional artists. It's a clearing house for photographers, painters of all sorts, and digital artists. I've lately become fascinated by the digital artists. They are truly the innovators and pioneers of modern artists. Most of them share my love for fantasy art. That follows, doesn't it? People who love science fiction and fantasy usually love computers. Hence, their art medium becomes the new digital technology out there. One of the features that I love about Deviant Art (DA its commonly referred to) is that it allows for artists to compose tutorials and post them along side the artwork. Its a wonderful online community there. The spirit of collaboration is amazing. Its so supportive and encouraging. I've recently downloaded some tutorials on making digital art with Photoshop. I only have Photoshop Elements which is a stripped down version. But, most of the features are there. I also have an inexpensive WACOM pen tablet. That's what many of the artists say they use. I'm experimenting. If I get a piece completed I'll post it. I'll probably start a separate blog for the digital material. I understand that ArtBlogs4U is opposed to listing digital art. So, I'll give you the link when I do it.

Saturday, July 21, 2007

Art Blogs 4 U

I hope all my loyal and beloved readers will notice there is a new link added to my favorites list. Its called Art Blogs 4 U. I love the concept of this site. Its basically a clearing house or collection of blogs written by artists about their work. Very much like mine. I have applied to the list host with the hope that my blog will be added to her list. Its a moderated site so she will do a review of my blog before she adds me to the list. Keep your fingers crossed. I would like very much to be part of this group.

Friday, July 20, 2007

Watch the Artist - Final Chapter


It's Finished! For better or for worse, I'm done with it. Is it successful? Hmmmm? It is successful in some ways more than others. Am I happy with the result? Is it what I expected? Not entirely. Remember that we were working on a new technique here. We were throwing in several new variables I've not dealt with before.


Let's start with the positives. I think the modulation of skin tones is more successful than any of my previous works. My ability to capture the light on the figure is much improved. The inclusion of cool (bluish) skin tones in the reflected light is an improvement over my previous works. I also hit a few spots with harder notes of red and gold that I had been afraid to try before.


I feel I have to stop there with the positives. I ended with several problems I couldn't reconcile. I lost the likeness. That is one thing I have always prided myself on, my ability to accurately render facial features. The foot and hand are a mess! Ugh! My draftsmanship is usually much better than this. For most of the drawing I retained great contours in that hand and foot. I knew we were working small scale and I would have to be careful. But, that last round of painting covered up some landmark lines and I lost the forms. I thought I could bring it back with some pencil work and shading. I couldn't. The background looks like an afterthought. It was supposed to be somewhat impressionistic of a tile wall. I missed. I also made a technical error that ruined the background, also.


Thoughtlessness! I reworked the face and made some adjustments with colored pencil. Things were looking good. I added some blue tiles into the "grout" lines in the background. They really sparkled for a while. I added the little "Gemini Art" cartouche. Then I made the mistake. I started to give the work one last coat of acrylic matte varnish. To my utter horror most of the delicate prismacolor work began to melt and blur away. That hadn't happened on the underdrawing. But then I remembered the underdrawing was done on bare paper. This pencil work was glazed over top of a solid coat of acrylic pigments and matte medium. There was nothing for the prismacolor pigment to hold on to. So most of it simply brushed away. The darkest, most intense pencil work remained but not the delicate blending and shading work. Note to self, "Don't liquid varnish over CP work. Use fixatives only!!" How many times are artists told to spot test a small section before applying chemicals to a whole work? I certainly learned my lesson. Oh well, that's why I'm still considered an "amateur" artist.


I thought about redoing the prismacolor work. However, both I and the subject are tired of this. When I ruined it with the varnish accident I do believe Mr. Pink Trunks scowled at me. I wondered about redoing that last step, but he told me he wasn't leaning against that tile wall for another five minutes. Then he stomped his foot and stormed off while I put up my art supplies. I told him that's the last time I'd work with him. I won't tolerate a model who cops an attitude with me. Maybe he can find work modeling as a superhero for the comic books. I only do "serious" artwork anyway. So there!


P.S. You guys do realize that last little bit was a complete and total fabrication to lighten the mood over the disappointing finish of this work, right?

Friday, July 13, 2007

Watch the Artist, Part Six


The painting stages have officially ended. But, it's not finished. I'm sure some artists would leave it here and say they want to allow it to have that "painterly effect." Or, I could take a few more steps and many more hours of painstaking detail work to finish the hands, feet, face and background in acrylic. However, those parts are going to require a lot of detail and I've never been a fan of working with brushes the size of an eyelash.


I said from the beginning this would be a piece of artwork that combined prismacolor pencil with acrylic. I feel a lot more comfortable with doing the detail work in prismacolor because I like the control I have with the pencil.


In this last painting stage it was all about drybrushing and evening out the rough edges. I mixed a very neutral beige color using mostly white gesso and burnt umber. Just for the sake of harmony I added a generous portion of the original skin tone color. When I felt comfortable with the smoothness of the edges I mixed a bright yellowish white to added some sheen with highlights. As you see, I replaced that awful yellow foreground with a neutral grayish blue.


I'll varnish it again and get started with the pencil work. Please be patient and give me a few days to work on this next part. I'm sure I'll become very obsessive compulsive about the detail. Let me know what you think so far.

Thursday, July 12, 2007

Watch the Artist, Part Five - Sunburn!!


Oops, I accidentally gave him a sunburn. I'm sure several of you are laughing at me. After all the big talk I made about not mixing skin tones too red or too pink, here I go and blister this guy. Don't worry, it'll be okay. I'll fix it.


Here's where we are. This is the "dry-brushing" stage. I hadn't intended to be at this stage right now. But, as experienced artists will tell you, you have to go where the artwork takes you. It seems to me that there comes a point in a piece of artwork where it almost takes on a life of it's own. After that, its a mistake to force the thing into being something its not. If you've planned well and have established a well balanced composition and have included solid principles of design, then it'll probably end okay.


I had intended to intensify the shadow edge of the figure. Remember, the shadows were originally painted with a low intensity cool steel gray. It was great for the color scheme but really didn't do much to model the shapes of the form. So, I used a dark burnt umber to intensify the shadow edge. That was working okay. What remained of the steel gray worked perfectly as a reflected light in the shadow. But, I began to notice the burnt umber was to harsh and overpowering for the colors and values I'd used up until this point. I also felt as if the figure was a little too yellow and lifeless looking especially because the blue background served as a complementary color to the yellow in the skin tone and projected it stronger than it should be. So, what to do? Time to add a little color to the skin. I added just a touch of cad red to the skin mixture I was using. I loved the way it looked on the face. So, I kept going. I'm afraid I went a little overboard with it because I liked it so much.


We're nearing the end now. We only have two or three steps left. I'll probably finish one more of them this afternoon. Next is to go back to the more neutral and lighter skin tone and blend the edges of the colors. Then I'll go with almost pure white, possibly titanium white now, and add highlights. I'll probably varnish it again at that point to lock down what I've done. Then, the final step will be to use colored pencil work to detail the face and finish the background.


I'm also going to redo that tile floor he's standing on. I thought putting brown down there would tie into the brown on the figure. Big mistake. I hate the way that looks. I want that to be more bluish so it doesn't detract from the figure. Remember, cools recede, warms advance. That warm yellow on the floor jumps out and takes attention from the figure. Gotta stop that.


Wednesday, July 11, 2007

Watch the Artist, Part Four


We're about to enter what some art instruction books call "the ugly phase". So, prepare yourself. This part always scares me. I just have to think of it as the challenge to overcome while working toward a beautiful finished artwork. We've covered our figure in a base coat of local color. Basically, we've covered the skin with a light skin color. But, as the light touches our guy his basic skin color will change lighter and darker. We're going to make him start to "pop" off the page now. He looks very flat because he's all one color. To make him start to "pop" we'll add a warm color that will advance toward us, red, right? We'll take a big dollop of that base color we made up and starting adding a hint of cad red to it. When it turns noticebly pink we're ready to use it. Use the reference photo to find all the aread on our guy that is sun-kissed. All the bright areas and highlights get a stroke of this color. Add the glow of health and fitness to him. We'll not cover all of him with this color, especially not the shadow areas. We also want that golden skin tone to peek through here and there. It's more interesting that way, I think.


So, now we go back to the shadows again. We can see them under the skin color because we underpainted them maroon, remember? I'm not one to rush into things too quickly. That's the conservative, non-risk taker in me. I'd hate to get too eager with my color selections and ruin everything I've done up to this point. So, we're going to make a gradual progression toward our shadow areas. Some people might think to create a shadow color would mean to mix up a darker color of skin tone and paint the dark spots. But, that's boring. We don't just see shades of light and dark. We see change in color and changes in temperature. His shadowed areas are not just darker, they're cooler. Cooler colors also change color, they change hue not just change value. I'm going to be bold and choose a cool color. We'll go back to that dark neutral we created for the background and put a big dollop of it into a new area. Begin adding white gesso until it turns about fifty percent gray. I see that this truly is gray and has little temperature to it at all. So, I add a touch of blue until we have a pretty steel blue, or cadet blue as it used to say in the Crayola crayon box. This is going to help harmonize our color scheme. The parent of this shadow color is the same as the dark cast shadow color in the background. It's also very close to the same hue as our blue-gray background. See, there's method to my madness. Color harmony is one of the principles of design. We'll lightly paint the shadows with this color. I work very gradually and keep an old, clean brush handy. After I paint a small area I use the clean brush to gently blend and soften this color as I apply it. I want to start to eliminating my hard edges. Take several breaks to step back and look at him from a distance. Is he starting to lift off the page a little? I hope so. Let's not do too much with this shadow color. We can always add more. It's harder to cover up or take away.


Give the floor he's standing on just a little texture and we're done with this step. I notice that I've lost some of the edges I wanted to keep and I've really lost the face. So, before it's too covered I take a colored pencil and bring those lines and edges back into focus so I can see what I'm doing. I'm gonna cover this guy with another coat of matte varnish. Acrylics have the bad habit of turning loose when you paint several thin layers. The varnish helps lock things down in between layers so we can keep working without worrying about that. Now, let's set him on a bright shelf in the living room and live with him for a while so he can tell us what he needs next. Mist and cover the paints so they don't dry out. Let's watch TV with him for a while.


Tuesday, July 10, 2007

Watch the Artist, Part Three


Okay, here we go again. In this session we've started to paint. Sounds easy enough, right? Well, what paints shall we use? Anyone out there have a tube of skin colored paint? White skin, tan skin, shadowed skin, shiny skin? No? Then I guess we have to mix our own. But first, use matte varnish and cover the whole page. I don't want the paper to curl and pucker so we'll prepare the paper with varnish and then paint on top of that. While this varnish is drying we'll mix paint.

I'll talk about mixing skin color in a minute but first let's get the boring stuff out of the way, like the big shadow on the wall behind him. I like getting the background out of the way early because I'll feel better knowing I won't have to work on it later. I can focus on the fun of painting our good looking swimmer dude. I learned from a smart artist (and from making several dull paintings) that you never paint with black except for tiny little bits to serve as emphasis. The most beautiful blacks are mixed as rich, dark neutrals. True blacks completely close out the light reflecting potential and cause the painting to look flat. So, we'll mix our "black" using a warm and cool complementary color. I start with equal parts of Raw Umber (a dark warm brown) and Prussian Blue (a dark navy blue). I adjust the mixture until it I can't see a bluish or brownish tint to it. Then paint the shadows.

Now, back to the skin color. For Caucasian skin, which our guy is, we need to have a gold cast to it. Pink? NO! Trust me, if you start with pink the poor young fella will be sunburned from the get go. Take a look at most make-up foundations. The base is usually a very sickly yellowish color. Then, pinkish highlighting powders and shadows are put on to that. Think about painting our guy with those colors. Let's look at our source photo for reference. Sure enough he has a healthy golden glow to his skin. The shadows on his skin are a ruddy brown and where he's had to much sun there's just a slight pinkness. But, we usually focus on the pink in a person's skin because in color theory cool neutral colors recede and warm saturated colors advance. Therefore, the warm reds in a person's skin pop out at us.
I know that if we don't emphasize the drawing with a dark rich color the colored pencil lines will be covered up by the opaque paints. So, let's mix up a dark natural skin color, a dark, brownish maroon color (cadmium red and raw umber with a touch of white gesso). Just about the color of a bad bruise. Paint over the pencil drawing with the bruise color being as careful as you can not to lose the image. It won't be perfect because a brush won't be as accurate as a pencil. This thin maroon color will have some brush strokes in it. But, that's okay. This is underpainting. There will be several layers on top of this. You might still see a little of it when we're finished, but just barely. This is like the skeleton. You don't see a person's bones when you look at them, you just know they're there. Right?

While this dries mix the base coat for the skin. Let's not mix too yellow or we'll give him jaundice. Let's not go too red or he'll look sunburned. Start with a big dollop of cadmium yellow. Then, add just a touch of cadmium red. You'll be surprised how far a little touch of red will go. You'll make orange in a hurry with just a little bit. When you have a yellowish orange color start adding white gesso. Add a little at a time until we have a healthy light peach color. Then add a touch more white because acrylics always dry a little darker than you think. So go lighter to be on the safe side. At this point I use gesso for the white instead of titanium white because I want the easy flow of the liquid paint. Titanium white will be so thick it will cover every thing we've done. And right now we still want some translucence. Carefully, start to overpaint the maroon colored figure with the peach color. If its too opaque to see the underpainting wipe it off. You can do that if you primed the paper with varnish. Add a little water and try again. Then, base coat the swim trunks with a light pink mixed from cad red and white and paint them. When the figure is covered we're done with this session. Gee, that was exhausting let's go take a nap and dream of what he'll look like when finished.


Record Hit Count on Flickr!!

Here's exciting news. I just checked my Flickr album. I have three pieces of artwork that have just past a landmark for my little album. "Gridiron Warrior","Poolboy", and "Ganges" have reached or exceded 100 page views each. I only hope now that everyone that viewed the photo would also go to the gallery site and make a purchase. Or, at least drop me an email and let me know if they like what they saw. But, I see progress. The future is bright.


Monday, July 9, 2007

Watch the Artist, Part 2


Thanks for checking in again. I hope this little drawing is holding your interest. This is the second stage of my process with this drawing. First of all, let's review where we've been. We started with a simple line drawing in graphite of the figure that established composition on the page and proportions. Now, we've undone everything we started with. Honestly, I went back over the drawing with a drafting cleanup bag and almost completely obliterated the original graphite until it was barely a ghosted image. Then, as I removed a few lines I replaced them with prismacolor pencil. I didn't do that all at once. I went very slowly and carefully one line at a time. This is definitely not a time to rush through the work. We all know that every fine piece of artwork begins with a top-notch drawing. Without that, what have you got? Nothing. In this stage I've replaced the graphite with a very subtle neutral pinkish color. I'm still just wanting a ghost of an image. This will be the framework to which we'll ad color and light. As you can see, our guy looks a lot more substantial now. As I replaced the line work I also began modeling forms with a very soft hatching. This is not a step that is supposed to stand out. When I work in this step I like to think of applying the pigment as you would be sprinkling the paper with powder. There is nothing in this stage that is applied so intensely that it can't be edited easily. Just while I've been looking at this drawing while I've been writing I've seen some spots that need editing. I don't really like the balance in the foreground of the tile work on the floor. There appears to be more on the right than the left. So, I'm about to get the kneaded eraser and remove from the right and then add to the left. I'll keep you posted. Click on the picture to see an enlarged version.

Sunday, July 8, 2007

Watch the Artist


Here's the beginning of a new piece I'll be working on. I thought it would be fun to let the readers follow along on this one. For those of you who are fellow artists, you can laugh at my mistakes. For those of you who are not artists, I hope you'll get an idea how much time and energy it takes to put a piece of artwork together. To help you get an idea of the scale we're working with, this support (Artagain Paper) is roughly 8.5X 19, in. The paper is about the thickness of poster board (a little thinner) with a light texture to it. This particular paper is a light ash gray. I know this particular dimension is a little strange. However, I'm basically working on a piece of scrap here.
Now, we have the potential for a lot of mistakes, because I'm gonna be practicing new techniques. My last artwork, "Blue Towel," was pretty basic traditional colored pencil technique. But, as with anything, if you want to improve you have to practice. You have to try new things. So that's what I'm doing here. I found an artist's website that executed the most beautiful figurative work using a combo of acrylic paint washes and Prismacolor pencils. He even has a page on his website that describes his process. His finished works have an almost airbrushed delicate quality to them. But, he stresses that there is only hand drawn pencil work on the artwork. Since acrylic and colored pencil are the two media that I work with primarily, and I love figurative subjects, I thought I'd try it out.
This is not the most imaginative or original subject, I realize. But, since I'm trying something new I didn't want to deal with a complicated pose or a lot of wrinkled, flowing, billowing drapery on the figure. So, we'll stick with something simple, a straight forward athletic figure in full sunlight lit from the upper right. I also had this "scrap" of gray paper I wanted to use. Because of it's dimensions I needed an upright standing pose. This one just happened to fit perfectly.
Although we're just at the very beginning of the drawing, there has been a lot of work that has gone on already. I've worked about three or four hours off and on to get to this stage. Let's keep track of the time on this one so I can charge by the hour plus the cost of materials like a building contractor. So far, I've copied the source photo in black and white (you can see values better in black and white) and in color. I decided what part of the photo to use. There is a lot of empty, unimaginative background in the original that we're not going to use. But, there's a contrasting shadow being cast on the wall behind our guy that will lend some interest to the work.
Since this support is a little flimsy, and we're going to be using a little bit of wet media on it, I've taped it down with masking tape on a foamboard backing. I've tested the paper's reaction to getting wet. It puckers a little but smooths out again when dry. I hit it with the blow dryer for about 2 minutes and it was right back to flat. We won't be drawing on it when its wet anyway. And the piece I tested wasn't taped to a backing. We should be in good shape here. I think matte board would be a better choice but I don't have any. If we do this again we'll get the matte board (but have to charge more for the drawing because matte board is more expensive).
After that, it was a simple matter of enlarging the subject to fit the paper. For those of you who are not artists that might not sound so simple. But, trust me, it just takes a little practice. I checked and double checked my proportions and angles. Then did almost an hour's worth of clean up with a kneaded eraser and drafting cleanup bag. I've done all that just to have created the equivalent of a coloring book page. The next step will be a little heartbreaking. All of these dark graphite lines have to be replaced (therefore erased) with a more subtle, neutral Prismacolor line. I'm expecting another two or three hours for that part. Did you notice I didn't work in a lot of detail on the face? He looks a little comic bookish, right? Its because I didn't want to have a lot of eraser marks and roughed up paper on the face. I just drew in the landmarks, I'll detail the face in color. Then, after all that, we finally get to add just a little, and I mean a very little, bit of paint.
Hope you didn't think this would go quickly. It might be almost as interesting as watching paint dry.

Thursday, July 5, 2007

I'm in the Art Business!


This little miracle of the cyberworld is great. As I promised yesterday I took care of the business of getting connected with PayPal*. It's been an all day process, required an overhaul of the Gemini Art webpage (after I had just finished and overhaul of the Gemini webpage) and the purchase of new software.
The problem also boiled down to faulty design software. The version software I was using was about four years old. I couldn't figure out why I kept getting error messages when I tried to link or make sales buttons for PayPal. I'd gone through the registration process and had been confirmed years ago. I've bought things on ebay through Paypal. I started researching my software and found that my version was 5.0. The most recent version is 7.0. So, I'm a little behind. No wonder I was out of sync with the operation. PayPal doesn't even use the same addresses that were programmed into my software. But, I'm all fixed up now with some beautiful "Add to Cart" buttons on my catalogue page that work like a dream.
I only have one small problem. This new software writes the site into code that is a little different. I guess with the advent of a new version of Windows and a new version of Internet Explorer the design software had to modify some things. You can't imagine how my heart leaped into my throat when I clicked on my link and got the IE disaster warning. I had to log on to my ISP and go directly into my website file manager to find the correct file. I'll correct my link on blogger but I'm afraid there are a lot of people out there that will be trying to find the gallery and thinking I've taken the site down.
So, here is the new "revised" Gemini art web address. Please forward it to everyone that might have missed this blog.

Tuesday, July 3, 2007

Grand Opening - Gemini Art Gallery is New and Improved

At last!!! The new site is up and running. http://members.cox.net/gemini_art/gemini_art.htm.
I can't describe how excited I am about this new site. There are so many improvements that I want to point out to you.
First of all, the color scheme and layout is much more inviting. I got rid of the black and orange that made it so imposing. Also, I have samples of artwork on the very first page. I realized that if I have an art gallery website, I needed to focus on art. I narrowed my focus and only featured the works that I like. I read a few essays online about good website design. They all recommended that the content be very direct and to the point. I've included an artist's statement in the "about me" section. I've decided to highlight my figurative works. On my last site I was showing my landscapes and everything. I thought (in my misguided way) that I was demonstrating my versatility. NOT!! The truth is that they (the landscapes) were just not good. Creating artwork with the male figure as the primary subject is my first love. Its what I enjoy working on and so that's what I plan to showcase on this site.
I've finally decided to sell my artwork. The first website was truly a gallery only. It was my little photo album of what I can do. But, now I've decided that if someone enjoys my work, I'd like to see it hanging on their wall. I've had very kind complements from viewers on this blog and from other sites. Its given me the confidence to put prices on the work.
Now for the disappointments. I want very badly to be able to accept secure payments. I tried for a long time tonight trying to get Paypal sales to work. I have a Paypal account. I took all the right steps of creating "Buy Now" buttons. But, to no avail. If anyone out there in the cyber ether knows how to make this work, let me know. I'm desperate.
I've also included more contact information, even my phone number. I may regret that decision, but we'll see. If it results in my selling a painting, then that's great. I also included a paragraph soliciting commissions and models. I know it looks a little presumptuous, but taking on commissions is one more source of income. If I want paying clients then I have to ask for them, right? I was hesitant about asking for models. However, I know that to create legitimate, respected work I have to create unique and original subjects. I can't spend an artistic career just copying from photos taken by other artists (photographers). I have ideas for artwork that will never be realized unless I contract and pose my own models. I may get some undesirables because of this, but I'll use my own judgement about who to accept. If there are any artists out there with advice, I'm willing to listen. But, for now, please visit the new site and let me know what you think. Link to it and check back often to see when I post new work. It would be nice if you also bought a painting or two.